
Dorgem is a webcam capture application for Windows 9x and up. Any Video for Windows compatible webcam (or other digital camera) is supported.
It has unlimited storage events that can put the captured image on an FTP site as well as a local disk, all with their own time interval. It can put a unlimited texts and bitmaps on the captured image before the image is stored.

Klick Below(or read more) if you want to now how to:
Use your PC and Webcam as a motion-detecting and recording security camera (with Dorgem)
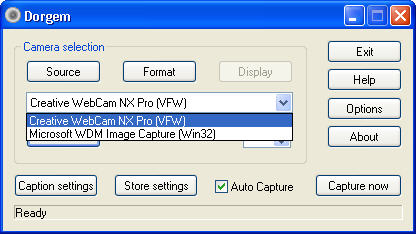
- Launch Dorgem and select your Webcam from the Camera selection drop-down list.
- Click the Preview button to display the view your webcam has. Physically adjust the camera to face the area you want to monitor.
- Click the Source button and make any adjustments to the Brightness, Contrast and/or other settings. Click OK when you’re happy with the results.
- Click the Options button
- Place a check in the box labeled Use motion detection. Certain Webcams (most often Labtec) can require Dorgem to “reconnect” after a certain period of no motion being detected. For now leave this box unchecked. If you notice that your Webcam isn’t capturing any images even though it should have, revisit this section and place a check in the box. It should be noted that if you do need to use this setting, your cam will likely take a picture every time Dorgem “reconnects” to it, so try using 5 minute (or higher) intervals. Otherwise you’ll end out with a LOT of pictures, most of which won’t have captured actual “motion”.
- Click OK after you have enabled motion detection to return to the main Dorgem window. Now you’ll need to create a ‘profile’ - which Dorgem refers to as Storage events. Click the Store settings button to create an event.
- Choose File and click OK (adding an FTP event is covered in the Advanced section, set a local file first to make sure everything works)
- Enter a Name: for this event, make sure Enable is checked, and then set an interval. Since you’ll be using motion detection, you probably want to capture images fairly “closely together” - so try 1 or 2 seconds. If you know for certain that this camera will detect a lot of motion (your camera faces an area with a lot of movement) you may want to set this somewhat higher. This setting can always be changed later, so experiment a bit. Click the … button next to Filename:
- Here you’ll be setting the folder to save images to, and the actual filename for each image. Dorgem allows special characters in file names so that each name is unique (otherwise each time your camera detected motion it would take a picture and over-write the previous one). Somewhere in the file name, enter the characters %g - which will give your file name a time-stamp. If you use %G in the file name, it will also add the current year.
Because my camera is taking pictures of movement on my patio, I named the file patio-camera%G%g. This results with images being saved as patio-camera20060926165001.jpg. Broken down that’s patio-camera - the current year - the current month, day, hour, minute and second. Click Save after you’ve selected a folder and file name.
- Click OK
- Click Close to return to the main Dorgem widow
- Wave your hand in front of the camera. Or throw something within its view. Jump around in front of it like an idiot. If everything was set correctly, you should now have some images in the folder you specified. Go take a look..
- If it didn’t work, start again at step 3 and double-check everything. The built-in Help file included with Dorgem is actually pretty helpful - use it for troubleshooting. Feel free to leave a comment below and include as much info as possible and I’ll try to help as well.


0 comments:
Post a Comment